Educated Climber.com

  • Start Here
  • Content
    • Tree Climbing Basics
    • Tree Work Basics
    • Professor Ed Gilman Teaching Series
    • Knots
    • Rigging Basics
    • Chainsaw Basics
    • Basic Jobsite Skills
    • Pests and Diseases
    • Tree ID
    • Small Business Resources
    • Additional Resources
  • Podcast
  • Blog
  • Shop
  • Subscribe

Chlorosis

April 10, 2017 By patrick@educatedclimber.com 6 Comments


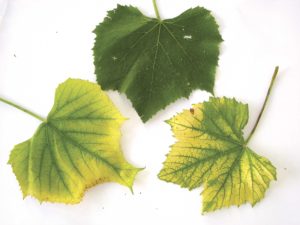
photo courtesy of Washington State University

Chlorosis is a condition in which leaves produce insufficient chlorophyll. As chlorophyll is responsible for the green colour of leaves, chlorotic leaves are pale, yellow, or yellow-white. The affected plant has little or no ability to manufacture carbohydrates through photosynthesis and may die unless the cause of its chlorophyll insufficiency is treated.

Chlorosis is typically caused when leaves don’t have enough nutrients to synthesise all the chlorophyll they need. It can be brought about by a combination of factors including:

  • a specific mineral deficiency in the soil, such as iron;
  • a high soil pH (alkalinity) at which minerals become unavailable for absorption by the roots
  • poor drainage (waterlogged roots)
  • damaged and/or compacted roots
  • pesticides and particularly herbicides may cause chlorosis, both to target weeds and occasionally to the tree being treated.
  • exposure to sulphur dioxide

The lack of iron is one of the more common nutrients associated with chlorosis. Manganese or zinc deficiencies in the plant will also cause chlorosis. The way to separate an iron deficiency from a zinc or manganese deficiency is to check what foliage turned chlorotic first. Iron chlorosis starts on the younger or terminal leaves and later works inward to the older leaves. However, manganese and zinc deficiencies develop on the inner or the older leaves first and then progress outward. Plants need iron for the formation of chlorophyll.  Iron is also necessary for many enzyme functions that manage plant metabolism and respiration. Iron becomes more insoluble as the soil pH climbs above 6.5 to 6.7.  With most plants, iron can only be absorbed as a free ion (Fe++) when the pH is between 5.0 and 6.5.  Other elements such as calcium, zinc, manganese, phosphorus, or copper in high amounts in the soil can tie up iron so that it is unavailable to the plant. However, a shortage of potassium in the plant will reduce the availability of iron to the plant. Insufficient iron in the soil is also (although much less frequently) a problem.


CONTROL

If an immediate result is desired, then a foliar application of ferrous sulphate is needed. Ferrous sulphate should be applied at a rate of 1 oz./gallon of water with a few drops of dish soap added. This method of application allows for the absorption of iron directly by the leaves and results should be seen within ten days. The application of iron chelates or sulphur directly to the root zone is another method of treatment. Results are slower to appear but can last for one to two seasons. The rates of application are on the package. Finally, the soil can and should be amended if iron chlorosis has occurred. Working peatmoss, compost and/or well-rotted manure into the vicinity of the tree or shrub well increase the availability of essential minerals and nutrients. If the iron chlorosis is severe then the combination of the foliar spray and an application of iron chelates to the soil is recommended.


This page was compiled from multiple sources, including the Wikipedia article here, and the University of Illinois Extension office here.


Climb high, Work smart, Read more.
– TreeMuggs


I would love to hear from you. Please send all comments/questions/hatemail to patrick@educatedclimber.com


Filed Under: Back To Basics

Mechanical Advantage Explained

April 2, 2017 By patrick@educatedclimber.com 13 Comments

Crane at Prague Castle, photo courtesy of handshouse.org

“Any sufficiently advanced technology is indistinguishable from magic.”
– Arthur C. Clarke


“Mechanical advantage is a measure of the force amplification achieved by using a tool, mechanical device or machine system. Ideally, the device preserves the input power and simply trades off forces against movement to obtain a desired amplification in the output force. The model for this is the law of the lever.”   – From Wikipedia


One of the most common situations that arises in tree work is the need for pulling power. We use ropes to pull tops, pegs, and whole trees, as well as lifting and tensioning sections of limbs and logs. Ropework is fascinating to me. Rope is an ancient tool that has been used for centuries, but its use is a dying art – the average person on the street can barely tie their shoes. Our trade is one of the only groups of people that still uses rope to get work done. Today we are going to explore mechanical advantage and how we can use simple physics to amplify the forces in a rigging scenario.

I have read that a person can pull approximately 60% of their own weight horizontally along the ground in good conditions. So if we need a 500 lb pull to get something done and we have a single groundman who weighs 200 lb and can therefore generate around 120 lb of pull, how can we accomplish this 500 lb pull? The simple answer is that the groundman can go find 4 or 5 good friends who are willing to drop everything and come and help him pull on the rope.


source: Wikipedia

This would be an example of working harder. But working harder isn’t always the answer. For one, we usually don’t have the manpower to simply pull on the rope, and two, it’s, well, hard work. So what if we wanted to work smarter to accomplish the same thing? How could that single groundman get the job done, all by himself? The answer: mechanical advantage.

Mechanical Advantage: The Concept

There are many forms of mechanical advantage, but generally, when we use the term, we are talking about the use of ropes and pulleys (block and tackle) as a means of amplifying forces in a system, allowing us to pull much greater loads than we would otherwise be able to.

All mechanical advantage systems using block and tackle are based on a simple observation:


In order for stickman to hold the weight suspended in mid-air, he must pull down with 100 lb of force. So, if the weight is pulling down with 100 lb of force and the stick man is also pulling down with 100 lb of force, then the total amount of force being exerted on the pulley must be 200 lb. The concept that we are trying to understand and make use of is: where you have a load and an anchor connected by ropes and pulleys, forces can be multiplied at the pulleys. And if forces can be multiplied at pulleys, why don’t we attach a pulley to our load? Using just this simple observation, we can design some amazing hauling systems.

(On a side note: the observation above plays an enormous role in aerial rigging system design using blocks or pulleys, where rigging points are exposed to forces far greater than the weight of the pieces being lowered, even without considering shock-loading. We will explore rigging system design in future articles.)

The simplest use of mechanical advantage involves an anchor point, an input force, and a pulley on the load:

Here we are pulling a load uphill. We have tied our rope to an anchor point, in this case a tree, and then run it through a pulley attached to the load. So in this example, you can see that whatever force stickman pulls on the one side of the rope, from himself to the pulley, that same force is also exerted on the other side of the rope, from the pulley to the anchor. So, for stickman to hold the load steady without it sliding downhill, he only has to pull half the weight of the load, i.e. 50 lb, even though the load weighs 100 lb. This is referred to as a 2 to 1 mechanical advantage, or 2:1 MA. We can calculate it by simply counting how many parts, or legs, of rope are acting on the pulley: in this case there are 2, so we calculate a 2:1 advantage. It’s a very simple concept, but the implications are amazing.

Now, let’s imagine that stickman needs to pull the load right up the hill. You can see that his pulling power is doubled, but you might not have realized that the trade-off  for his newfound strength is that he must pull twice as much rope to move the load. In other words, if the rope were tied directly to the load, you would need to pull the full weight yourself, but for every foot of rope that you pulled, the load would advance by a foot. With this 2:1 MA setup, you only need to pull half as much weight, but to move the load 1 foot up the hill, you must pull 2 feet of rope.  Mechanical advantage always involves a trade-off: pulling distance for pulling power. As Robert Heinlein famously pointed out, TANSTAAFL, – “there ain’t no such thing as a free lunch“.

The Block and Tackle System

source: letoolman.com

The block and tackle system was reportedly invented by Archimedes himself and has been used for centuries for lifting and pulling jobs of all sorts. The block and tackle system builds on the general concepts that we have been talking about, but it goes one step further. A block and tackle uses two pulleys to multiply the forces in the system. One pulley is attached to the load and is referred to as the moving pulley. The other is attached to an anchor point.

The simplest form of a block and tackle system is a 2:1 mechanical advantage setup called a Gun Tackle:

In this setup, the rope “begins” or attaches at the anchor, then runs through the moving pulley, then goes through the anchor pulley. Same as before, let’s imagine we hang a 100 lb weight on that bottom, moving pulley and then we want to hold the weight suspended in mid-air. The bottom pulley is functioning exactly the same as our last example, serving to double the pull on the load. The top, or anchor pulley, serves as a re-direct, allowing us to stand on the ground to pull down on the rope. Without the re-direct up top, we would have to stand on the ceiling and pull upwards to get the 2 to 1 advantage, exactly as we did in our previous example where stickman was at the top of the hill and pulling upwards. So, to hold the weight suspended in the air, we pull 50 lb downwards, which gets re-directed by the anchor pulley up top, and then gets doubled by the moving pulley attached to the load, allowing a 100 lb weight to be held with only 50 lb of input force.

The next example is where things really start to get interesting. What if we used multiple pulleys? Here is a simple example of that, and then I will show the equivalent setup with block and tackle:

In this example, you can see that an input force of only 50 lb can support a load of 150 lb, since each leg of rope acting on the moving pulley is exposed to a 50 lb pull, and there are 3 legs of rope acting on that pulley, 50 x 3 = 150. Pretty amazing, right? Keep in mind that for stickman to hoist the load upwards, he would have to haul 3 feet worth of rope to make the load move 1 foot. Remember, every mechanical advantage system involves a trade-off, pulling distance for pulling power.

The above example can be set up using block and tackle, but instead of requiring two separate pulleys at the anchor, those pulleys are combined into a double pulley. This example is technically referred to as a Luff or Watch Tackle:

Hopefully by this point, you get the concept. We use pulleys and double pulleys to amplify forces. We require an anchor point and a moving pulley attached to the load, and we require an input force. We can calculate the mechanical advantage by counting the number of legs of rope that are acting on the moving pulley, which is the same as calculating the trade-off of pulling distance for pulling power. I don’t want to go into an exhaustive treatise on all the different setups of block and tackle. There are many definitive sources out there that will dig deeper. Instead, I want to now focus our attention on the most common applications of mechanical advantage used in tree work.

Assumptions

You know what they say, never assume, because when you assume, you make an “ass” out of “u” and “me”. However, for our purposes here, we will need to agree on some assumptions just so we can do some basic math.

Assumptions:

  1. all pulleys are 100% efficient, that is to say that friction is nonexistent.
  2. all pulling angles are 180 degrees.
  3. all pulleys and ropes are weightless, and ropes do not stretch.

These assumptions allow us to use nice, easy numbers. In reality of course, no pulley has perfectly zero friction and pulling angles are not always 180 degrees. So, realistically, when we say that a system is 3:1 or 5:1, it never actually is. It might be more like 2.89:1 or 4.73:1. But who wants to tell the new guy, “Hey, go grab the 4.73:1 out of the truck!” Anyway, you see my point. Let’s just agree to make some assumptions this one time.


Common uses of Mechanical Advantage in Tree Work

The use of pulleys is so simple and elegant and yet incredibly powerful. There are many, many ways to use mechanical advantage with ropes and pulleys in tree work, but I am not going to get into all of them. Instead, I want to focus on 4 uses of MA that can come in very handy. Once you understand the concepts involved and you have seen some examples, you will be able to design your own hauling systems, custom-made for the situation. Specifically, I want to look at:

  • 2:1  MA for pulling pegs
  • 3:1  Z-Rig setup
  • 5:1  Fiddle Block/Block and Tackle setup
  • Piggyback/Compound MA systems

Keep in mind that in order to set up any MA system in the field, you will require an anchor point. In residential work, the anchor point is often the limiting factor for using mechanical advantage, we can’t use MA without it. Jerry Beranek covers anchor points very nicely in his Working Climber Series Two, Disc 3. Basically, I define an anchor point as any fixed object that I can say without reservation is capable of withstanding the pulling forces that it will be exposed to. In the case of a pulley being installed on the anchor point, that anchor must be able to withstand many times the force of the pull, since the use of pulleys amplifies the forces. So, to set up MA systems in the field, you must have access to a bomber anchor point. Do not assume that an anchor point is strong enough – if you have doubts about it then don’t use it!

2:1 Mechanical Advantage for Pulling Pegs

First of all, I define a peg as the log or portion of log that remains after removing the crown of a tree. One really common scenario in our trade is a tree removal in a back yard, where there is not enough room to just flop the tree over, but there might be 25 feet of lawn on the one side of it. So we climb it, rig or freefall sections down, and then leave a peg which might be 20 feet tall, to be dropped from the ground. Most of the time, we can just tie a rope to the top of the peg and pull it over. But sometimes, the peg is very large and heavy, or has a backlean, and we don’t feel confident that we can easily just pull it over. There are many options for using mechanical advantage in this scenario, and one of them is to attach a block to the peg, instead of just tying the rope directly to it. The rope will “begin” at the anchor, run through the block on the peg, and then come back down to the input force. In this way, whatever we pull gets doubled on the peg. (Note that this can also be used for whole trees.) Here is what that might look like:


Now, obviously, if we really needed to go through the trouble of setting a block up top to double our pull, then we are most likely not going to use just simple manpower to pull it over. So, although I have shown it here with the pull coming from stickman directly, you would normally use either an additional mechanical advantage system for pulling such as a block and tackle or come-along, or you could pull with a vehicle or winch.

3:1  Z-Rig Setup

The Z-rig is a convenient pulling system that is quick and easy to set up and can provide a tremendous boost to the pulling power of ground workers. The most basic form of the Z-Rig uses just one rope which is tied to the load, an anchor point, 2 single pulleys and one or two prusiks. It looks something like this:

Now you can see why its called a Z-rig. You can verify that it is a 3 to 1 by counting the legs of rope acting on the moving pulley. The first 2 are obvious – from stickman to pulley and from pulley to anchor, but the 3rd might not be so obvious: the pulley being connected to the main line via the prusik counts as the 3rd. The reason that the prusik counts as the 3rd leg is because in a Z-Rig, the actual pull line itself is used to construct the MA system, as opposed to a pre-built rig that would attach onto the pull line. Remember, you will need to pull 3 feet of rope through this system to move the load 1 foot, but your input force will be amplified by a factor of 3.

Note: the Trucker’s Hitch is an even quicker application of the basic 3 to 1 concept, but it has a lot more friction in the system which reduces the pull. That being said, there are a great many situations where the pull from a Trucker’s hitch is all that is required, and knowing how to set one up quickly is very valuable. You can view how I tie the English Trucker’s Hitch here and see it in action here. A lot of people will laugh at a Trucker’s Hitch because of the extra friction that it has, but one of the best aspects of that friction is that it almost acts similar to a progress capture – the friction helps to resist the pull-back of the load. Let’s explore the concept of progress capture really quick.

Progress Capture

When we say progress capture in a mechanical advantage system, we mean that the system is designed to not slip back. In other words, if we advance the load a few feet towards the anchor but then we let go of the pull line, the progress that we just made is captured, the load cannot just move back to where it was. This feature of an MA system becomes very useful in critical situations. It is also much easier on the ground crew since they can heave-ho and then relax if they need to, knowing that the progress they just made with their pulling will not be lost. There are two main ways to achieve progress capture in MA systems: with an additional prusik cord, or with a cam device. In the Z-Rig example above, the progress capture prusik would usually be installed at the anchor pulley, between anchor and load. The prusik would contact the pulley and allow rope through (progress) when applying the input force, but if the input force stopped, the prusik would grab the line and not allow it to slip back through. A cam works the same way – it is a toothed device that allows rope to only move in one direction through it.

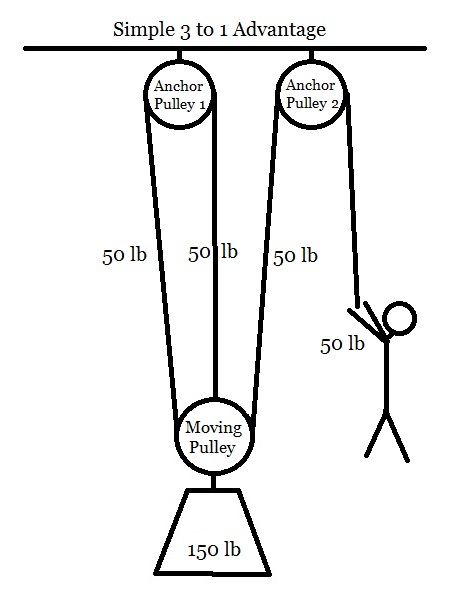
Progress Capture Prusik (installed on load side of anchor pulley)    (photo courtesy of rope-access.co.jp)

5:1  Fiddle Block/Block and Tackle setup

The 5:1 pulling system is probably the most versatile means of amplifying input forces in tree work. It can be used any time we need to generate maximum force on a rope, including tensioning, lifting, pulling, etc. This system really shines when your ground crew is limited in size, i.e. when there are only 1 or 2 people available to do the pulling.

A 5:1 system differs from the rest that we have seen because it is stored pre-built, i.e. you don’t put it together each time to use it. It consists of a spliced rope, 2 double pulleys, 2 carabiners, a progress capture, and a prusik cord for attaching to a load line. The rope of the 5:1 “begins” at the becket on the moving pulley, then goes twice through both pulleys before exiting at the moving pulley. In this way, you end up with 5 legs of rope acting on the moving pulley. It is hard to show all 5 legs of line with these simple drawings but it looks something like this:

This setup differs from the Z-Rig setup in that the actual rope attached to the load does not integrate into the MA system. Here the 5:1 attaches to the load line and then the rest of the load line just sits slack on the ground. Note that if you were to set this up backwards (i.e. such that stickman’s pull line exited from the anchor side of things) then the moving pulley would only have 4 legs of rope acting on it, and so this would be a 4:1 setup. So remember, with block and tackle systems, whenever possible, you want to set them up so that your pull is in a direction opposing the load, instead of in the direction of the load. This concept is referred to as “reeving to advantage”.

As far as names are concerned, I have been known to use the term “fiddle block” interchangeably with “5 to 1” or “block and tackle”, because they work the exact same way and they really are the same thing. Technically, a fiddle block is just a specially designed double pulley where the 2 sheaves are different size, with the smaller sheave sitting “inside” the larger sheave, which causes the 4 legs of rope to run “inline” through the system, as opposed to running side by side each other. Also, most fiddle block systems use cams for a progress capture while most block and tackle setups will use a prusik for that purpose. So, cosmetically they are a little different, but mechanically they are the same.

Fiddle Block system (photo courtesy westechrigging.com)
(progress capture cam is top left, where rope exits)
Standard Block and Tackle 5:1 system (photo courtesy arbtalk.co.uk)(note the progress capture prusik – blue rope)

Piggyback/Compound MA Systems

The final aspect of mechanical advantage that I want to touch on is what I call Piggyback systems. The basic concept here is that you can set up a primary MA system (usually a 2:1 or 3:1) and then attach a secondary MA system to act on the output line of the primary setup. In this way, the systems will multiply together to greatly amplify the resulting pull. For instance, if you were to build a 3:1 MA system and then attach another 3:1 MA system onto the end of it, the result would be 3 x 3 = 9:1 mechanical advantage! So this 9:1 system could be built with just 4 single pulleys, or it could also be built with a double pulley at the anchor and two single moving pulleys. Here’s what that might look like in stickman land:

Hopefully you can see the concept I am trying to convey with this kindergarten-quality picture. We have one 3:1 pulling directly on another 3:1 which multiplies the resultant output force to give us a 9:1 advantage! So for every pound of pull exerted by stickman, there are 9 pounds of force pulling on the load, but, for stickman to move the load 1 foot, he has to move 9 feet of rope through the system! The 9:1 setup shown above is only one of many compound MA systems that you can design once you understand all of the basic concepts that we have talked about. As with all of the MA setups that we have looked at, you must consider your anchor points when designing piggyback systems – they can be exposed to one hell of a load.


Conclusion

So, let’s return to the example way back at the beginning. Hopefully you can see that through the use of ropes and pulleys, our single groundman, now thoroughly educated in the ways of mechanical advantage, should be able to generate a 500 lb pull quite easily. All it takes is a solid grounding in the Basics, along with the right tools and equipment. Indeed, a groundman able to design and operate complex mechanical advantage systems such as these would be a highly valuable asset to any tree crew.

Thank you for sticking around to the end of another long-winded article. I really didn’t know it would run this long until I got right into the weeds, but I think it turned out really good. To paraphrase Blaise Pascal, “this one is longer than usual, because I had not time to make it shorter.” Thanks for listening. Now, heave ho!


Climb high, Work smart, Read more.
– TreeMuggs


I would love to hear from you. Please send all comments/questions/hatemail to patrick@educatedclimber.com


Filed Under: Back To Basics

Fiscal 36

March 17, 2017 By patrick@educatedclimber.com 3 Comments

I’m a rover, seldom sober.
(Age progression software, this is me in 10 years if I continue as a tree man…)

March 17 once again. For most, it is St. Patrick’s Day, the Irish homage to the juice of the barley and music of the fiddle. For myself, it is that too, of course, but it is also the start of my new fiscal year. Being born on St. Patrick’s Day is all it’s cracked up to be. It is time for the Guinness to flow. I am Irish on my mom’s side, by way of Newfoundland, the only true Irish colony.

It occurred to me several months ago that celebrating January 1st as the new year doesn’t really make any sense. What significance does that date have for me? I get a new day planner that I won’t use nearly enough, I get to chuck the Christmas tree out the door, and I’m left wondering what happened to all those “resolutions” from the previous January. And while all of this is happening, I’m nursing a hangover.

January 1st is an arbitrary date for me. It doesn’t feel like the start of a new year, it just feels like – Tuesday. After pondering the issue for far too long, I decided that instead of calculating the new year the way that everybody else does, it makes far more sense for every individual to calculate the new year based on their birthday. Today, March 17, 2017, I turn 36, so today marks the beginning of my new fiscal year, Fiscal 36. For people who are actually born on January 1st, well, lucky you. Your day planner was custom made for you. The rest of us will just have to make do.

Ah, the start of a new year. A time to reflect on what was, and to draw plans for the future. Here are some of the things that I was up to in Fiscal 35:


I signed my first Apprentice – James
I had always looked forward to signing an apprentice but the timing and circumstances never seemed right. But last year, the stars aligned and James became the first apprentice at ConservaTree. Looking forward to a great season of climbing and trimming. Glad to have you aboard James!


EducatedClimber.com
Fiscal 35 saw me finally taking the steps to build an online arborist resource at EducatedClimber.com and quite frankly, I don’t know why it took me so long. As they say, the best time to plant a tree is 25 years ago, the second best time is now. I bought a GoPro camera and mounted it to my helmet, I got a Youtube account, and I started producing videos and articles and building an audience. This has now become my obsession. At any given time there are a hundred videos bouncing around in my head that need to be made yesterday. And I love that I have gotten back into writing. I always felt that I could write, but for many years after dropping out of university I just didn’t really have an excuse to do it. Look for big things on the site in Fiscal 36. I will continue to provide value for my audience, through producing content for my apprentice James. My apprentice provides context for everything that I do on the site. I am not interested in talking about all the latest gear, my focus is Back to Basics. Without a grounding in the basics, you do not have a framework from which to evaluate the latest and greatest gadgets and gizmos. My goal is to provide a solid foundation of basics for a total noob to absorb that will allow them to be productive on the jobsite from day 1. That is my mission.


Podcasts
I started listening to podcasts in 2013 with the Lew Rockwell show, but burning a couple episodes to a CD was just too tedious. But last year I switched trucks and my new beast (’97) had a brand new stereo with aux-in and a usb port. This finally made it feasible to listen to podcasts while driving, which was a game changer. I live out in the sticks, so pretty much wherever I go is a long drive. Now I actually look forward to long drives because of the information and stories that I get to absorb. These are my current favourites:

The Tim Ferriss Show
Deconstructing world-class performers. Really fascinating stuff from one of my favourite modern authors. He literally wrote the bible: The Four Hour Workweek. Love it.

Favourite episodes:
Arnold Schwarzenegger Part 1, Part 2
Pavel Tsatsouline
“The Iceman” Wim Hof
Sebastian Junger (former arborist)
Rick Rubin
Coach Christopher Sommer
Kevin Kelly Part 1, Part 2, Part 3

The James Altucher Show – Business and life lessons from my favourite blogger.
How I Built This – Entrepreneurial inspiration from NPR
You Are Not So Smart – it’s true, and I’m not either
Smart Passive Income – Pat Flynn is the best


Books

Here are some of the books that I enjoyed this past year:
Rich Dad, Poor Dad – Robert Kiyosaki
The E-myth Revisited – Michael Gerber
The 4 Hour Chef and Tools of Titans – Tim Ferriss
The War of Art – Steven Pressfield
Outliers – Malcolm Gladwell
Choose Yourself – James Altucher
A Drinking Life – Pete Hamill
Folks, This Ain’t Normal – Joel Salatin
How to Fail at Almost Everything and Still Win Big – Scott Adams
The Subtle Art of Not Giving a F*ck – Mark Manson


Year of the Squat
I started Fiscal 35 with big plans for lifting weights. My main focus was going to be squats. I have always hated barbell back squats, they throw my balance off and they just don’t feel right. Front squats and kettlebell squats feel fine, but back squats don’t seem to work for me. I had always read that back squats are supposed to work your glutes and hamstrings, but all I could ever feel working was the quads. Also, it was always difficult to keep my heels planted, it always felt more natural to roll forward onto the balls of my feet. Fiscal 35 was going to be the year that all of that changed.

I bought a set of weights and a barbell from a guy who didn’t use them anymore, 465 pounds worth. I built a squat rack out of two skids and some boards. I started doing back squats with maybe 100 pounds but it just didn’t feel right. So what I ended up doing was just focusing on bodyweight squats. I did a lot of bodyweight squats. I focused mentally on the back of my legs – the posterior chain as they call it. I just kept doing squats and after maybe a couple of months something changed. I no longer felt it in the front of my legs, I could now feel it in the back. The problem with squatting for me was not muscular, it was neuro. I needed to wear a new groove in my brain, a groove that would allow the action of standing up to come from the back instead of the front.

So, after saying all that, I still haven’t gone back to barbell back squats, but plans are in the works my friends. I have been studying the technique and will be getting back into it soon enough. This is the video that I have found most helpful:

Candito Training – How to Squat with Perfect Form

I think it’s fair to say that Fiscal 36 will be the Year of the Squat, Take 2.


I found my album online

All the way back in 2003 I recorded an album at home on my computer called Waiting to Happen. A few months ago, a friend from way back sent me a link from the archives at CHRW radio, the campus radio station at the University of Western Ontario, and lo and behold, my album has been online this whole time. I had no idea. I wrote all the songs and played all the parts, audio quality is so-so, but it’s good for a laugh. All these years later, it remains, still Waiting to Happen.

CHRW Radio: Patrick Masterson: Waiting to Happen (2003)


Politics
Fiscal 35 was a year spent realizing that there is never a good enough reason to try to convince anyone else of your own political views. A bit of light reading about the Backfire Effect should be enough to convince us of that. My own beliefs about the values of personal liberty are evidently not shared by most. Most people, it would seem, have the desire to control everyone else. Not directly, of course, but they want to be able to choose which elected official will be in charge of controlling everyone else. Me, I just want to be left alone.

Further research: the Non-Aggression Principle (NAP)


Resolutions

1. Get up earlier
It seems that the only possible way to get any writing done in a house with 3 kids is to get up at an ungodly hour. For the past 5 or 6 weeks I have been trying to get up at 5:30 everyday, just so I can get some work done. I plan on making this a staple of my daily routine in Fiscal 36.

2. Daily Practice
After more than a year of experimenting, I am still in search of a short daily practice, along the lines of exercise/gratitude/journalling/meditating/writing, etc. etc. Fiscal 36 will be the year that I finally crack this nut. As Derek Sivers says, “If more information was the answer, then we’d all be billionaires with perfect abs”. Too true. See James Altucher for inspiration for a Daily Practice.

3. Drink less beer
I’m Irish. I like beer. I’m working on it. However, as old Abe said “It has been my experience that folks who have no vices have very few virtues.” Couldn’t agree more.


There you have it. Happy St. Paddy’s day, and, at least for me, the start of a new fiscal year. Slainte!


Climb High, Work Smart, Read More.
– TreeMuggs

Continue Reading: Zen and the Art of Tree Climbing


I would love to hear from you. Please send all comments/questions/hatemail  to patrick@educatedclimber.com

Filed Under: Back To Basics

Saw Chain Maintenance & Sharpening

March 14, 2017 By patrick@educatedclimber.com 18 Comments


(Note: This is Part 2 of my Chainsaw Basics Series. In Part 1 entitled ‘How Saw Chain Works‘, I went into all the terminology and the concepts of what saw chain is and how and why it works. Check out Part 1 here if you haven’t already.)


Maintenance vs. Sharpening

There is a reason I talk about chain maintenance as opposed to just “sharpening a chain”. In my experience, I have found that anyone can grab a file and scratch the teeth and come away with something that is sharper than when they started. You don’t necessarily need to even understand what you’re doing to be successful. If you don’t really understand the concepts involved, you may be able to get away with this a few times on any individual chain. That’s how I did it for my first few years. I saw other guys filing chains and I said “I can do that”, and I just grabbed a file and started going at ‘er.

The real skill however, comes with being able to take a chain through its entire lifespan, from brand new, all the way down to nothing left, and have it cut efficient and properly the entire way. That requires real knowledge of the underlying concepts. So when I say ‘sharpening’ I am referring to a single occasion where saw meets file,  and when I say ‘chain maintenance’ I am referring to the series of individual sharpenings that take a chain through its entire service life.

Another thing I’ve found is that you will get the best results if the sharpening on any one chain is always done by the same person. I find that different people working on the same chain over time gives really inconsistent results.

All of the chain that you will be working on is called “round ground” which means that it is sharpened using round files. You can also maintain these chains using a machine grinder, but that is beyond the scope of this article. I have always preferred hand sharpening using files. I find that using files forces me to slow down and really focus on each individual tooth, and it requires me to fully understand how chain and cutters work. So, for learning purposes and for general skills in the field, hand sharpening is superior.


Sharpening Kit


A note on files – the files that you use MUST be high quality, they DO have a lifespan, and they MUST be kept rust free. So this means, buy good quality files, preferably from a dealer; take care of them; and do not allow them to be exposed to water, because once they rust, their working days are done. And even if you take care of them, they will eventually lose their bite and need to be replaced.

For a filing kit being used in the field, I recommend having at least 2 files of each size on hand. Its the old rule of redundancy: 2 is 1, and 1 is none.


A note on file handles – like I say, files have a lifespan, they don’t last forever. So I greatly prefer a removeable type file handle such as this one, as opposed to having a bunch of regular old-school handles. This way I only need a single handle for my entire kit. You pop the file in, use it, and pop it out. This keeps my kit nice and small.

For the best results with sharpening, you are going to want a vise. At the shop, a good solid bench vise is perfect. In the field, you can use a stump vise, or a truck mounted vise, or a vise mounted to a piece of equipment. I have seen them mounted to bucket trucks and chippers, among other things. Yes, you can sharpen a saw without a vise, but it’s not nearly as easy or enjoyable.

                                           Bench Vise                                                Stump Vise


File and Chain sizes

There are basically 3 sizes of saw that we use, and each has its own size chain which uses its own size file. I won’t get into the measurements of chain pitch and gauge here, but basically we use small saws for aerial work, such as the MS200, we use medium size brushing saws, such as the Stihl 26 or Husky 346, and then we use larger saws, like the Husky 575 with 20″ and larger bars.

So, the 3 basic sizes correspond to 3 different size files. The small chains use a 5/32″ file, the medium chains use a 3/16″ file and the largest chains use a 7/32″ file. Make sure before you start filing that you are using the proper size file for the chain!


One caveat to file sizes is with the larger chain. You can see how teeth are designed to slope backwards, so the more sharpenings they have had, the shorter they get. This is especially significant on the larger chain, which starts out using a 7/32″ file, but once it gets down around halfway, you will actually want to switch to a slightly smaller file, the 13/64″.


The Concept

I find it best to think about sharpening on a tooth by tooth basis. So I’m not working on a chain per se, I’m just working on a single tooth at a time.

For each tooth, the process starts with inspection. The 2 main factors to consider when inspecting a tooth are: the corner and the chisel edge.

The corner must be very sharp for the the saw to cut efficiently. The corner is what starts the cut, and then the rest of the chisel edge carves it out. The corner is usually what gets damaged the most when a sawyer hits a nail or a stone. It can require quite a bit of filing to get back to a nice sharp corner.

The chisel edge is the leading edge of the top plate of the tooth. This is the actual cutter. This edge must be razor sharp. So the act of sharpening a tooth is the process of filing the chisel edge, which in turn sharpens the corner.

The third thing to inspect on each tooth is the raker. I personally don’t even look at the raker at all until the chain is at least half way down. Some people put way too much attention into the rakers and file them down too much, which makes the saw bite in way too hard and makes cutting very jerky.

Witness Mark

There is one more definition that you need to know before we get into the technique of sharpening, and that is the Witness Mark. The Witness Mark shows you the proper angle to aim for when you are filing. This is one easy way to distinguish good quality chain. Cheap chains don’t always have a witness mark.

The witness mark has 2 purposes:

  1. by following this angle when sharpening, it sets up a good aggressive corner on each tooth, helping the chisel edge to cut efficiently.
  2. it allows you to get the maximum life from each tooth. Each time you sharpen a tooth, it gets a little bit smaller. Following the angle of the witness mark allows the tooth to last longer. If you were to sharpen a tooth on too steep of an angle, you would end up running out of top plate at the back before you had run out of chisel edge at the front.


The act of sharpening a tooth is the process of filing the chisel edge, which in turn sharpens the corner. It may look very simple if you’ve seen an experienced person doing it, but it is not as simple as just dragging a file over a tooth.

Now as you can see, the cutter teeth are arranged in alternating fashion, one on the left side and one on the right side. This ensures that the chain cuts evenly and straight. So with the saw in the vise, I can only sharpen the one side. When I get done working on all the cutters on the one side, then I will go back through the chain a second time, inspecting each raker and filing as necessary. I will then take the saw out of the vise and turn it around so I can work on the other side.


Sharpening Technique

So, first things first, it is a good idea to wear gloves when sharpening a chain by hand. If you sharpen enough times you will eventually slip, and you can cut your hand pretty bad. Secondly, the chain must be properly tensioned before you start sharpening it. You will be applying pressure with the file – the chain tension must be sufficient to withstand that pressure and keep the tooth from moving. So, like I said, it is best to work one tooth at a time. There will usually be some teeth that need more attention than others. So it is important to really inspect each and every tooth as you go.

Taking your file, fit it into the tooth, and you will see that the chisel edge overhangs the file a little bit. This overhang is how you know that you have the correct round profile on this tooth. Your goal is to maintain this overhang of the chisel edge throughout the life of the chain, never more and never less of an overhang.


The area where I see the most confusion and the most problems is the concept of the round profile. When you are moving the file through the tooth, you are actually grinding every surface that it touches, but it is only the very top section, the chisel edge, that matters. So, to sharpen properly, you must be able to visualize where you are applying pressure with the file.


Proper Round Profile Proper Application of File Pressure

Consistently applying pressure with the file in the direction shown above will ensure that your sharpening activities properly maintain the correct round profile of each tooth and will allow your chain to cut efficiently throughout its entire lifespan. Countless chains have been ruined partway through their service lives by incorrect application of pressure with the file. Some people push down too much, cutting towards the rivets. Others don’t push inwards enough, leaving the chisel edge with an improper angle, not aggressive enough to really tear into the wood.

Holding the file level, you push all the way through, trying to exactly match the angle of the witness mark. You don’t usually need to apply much pressure with each stroke if your file is good. Applying a lot of pressure takes more material off the tooth and also increases the chances of your hand slipping. With a good file, all you have to do is apply nice, steady, even pressure all the way through. I like to hold the file with both hands: the hand at the back keeps the file level and lined up with the Witness Mark while the hand at the front “pulls” the file through the tooth and applies the inwards and downwards pressure. I will explain more further on in the article about pulling vs. pushing the file when we talk about side dominance issues.

Remember, the file sharpens on the push stroke only. So, coming back, don’t drag the file on the tooth. Just return it to the starting position. If the tooth wasn’t too bad to begin with, just give it a couple swipes and then get down and inspect it. You want the corner to be absolutely sharp, and the chisel edge should be uniformly shiny and sharp.

So, the process looks like this:

  1. Inspect the corner and the chisel edge,
  2. file the tooth as necessary,
  3. re-inspect,
  4. manually advance the chain, repeat the process.

So, continue this process, tooth by tooth, until you have gone all the way around the bar. Some people will mark the starting tooth with a black marker, but I just go by colour. If the groove isn’t nice and shiny, then you haven’t sharpened that tooth yet.

Generally speaking, you are trying to keep all teeth equal size. This is not usually too big of a problem, but if you have hit something serious like a nail, it can be an issue. Sometimes you will have a few teeth with bad corners while the rest of them are not so bad. It doesn’t always make sense to file down all of the good teeth just to match the size of a few bad teeth. In those cases, I just focus on the chisel edge on the bad teeth, temporarily ignoring the corner, and over time, the good teeth will nearly “catch up” to the size of the bad teeth.


Brand New Chain

Now, this may just be me, but one thing I have noticed with most brand new chains these days is that they are actually ground with a machine profile. I think this means that the manufacturers are assuming that you will be using a machine to sharpen them, as opposed to hand filing. What this means is that the first sharpening with a round file will be as much about establishing the proper round profile as it will be about actually sharpening the chisel edge. So generally, for the first sharpening on a brand new chain, you will need to be pushing a bit harder with the file than normal.


To Recap the Sharpening Process

These are the things to pay the most attention to:

  1. Corner
  2. Chisel Edge
  3. Round Profile (proper application of pressure on the file)


Rakers

So now that you have sharpened each tooth, you can turn your attention to the rakers. As the tooth gets filed down, the chisel edge gets lower and lower, until eventually the gap between the edge of the tooth and raker disappears. At this point, the tooth will not cut, regardless of how sharp the corner and chisel edge are. The standard depth setting for rakers is about half the thickness of a dime, or .025″. Like I say, I don’t even look at the rakers until the tooth is halfway done.

The standard way to check the raker is using a depth gauge tool. The depth gauge tool usually has 2 sides, one is the standard .025″ and the other is .030″, just slightly more aggressive. In practice, you won’t notice any difference between them so it really doesn’t matter which side you use.

So you simply set the depth gauge tool flat on the chain so that the raker rests in the groove. If the raker tip is exposed above the groove, then it is time to file it down. We use a good quality flat file for the rakers, and we always go in the same direction as the filing of the cutters. Raker filing is even more subtle than tooth filing, usually just one simple stroke will do, and rarely do you need to use more than 2 strokes. Whenever you file a raker, you will also want to take notice of the profile of the front corner of that raker.  It needs to stay rounded to move smoothly through the wood. So you may need to take a swipe off the front corner with your file as well.

Now in my opinion, the depth gauge tool really only has 2 uses: it is for anyone who is unsure of what they are doing, and it is for people who don’t want to bend down and actually look at each and every tooth. I don’t use a depth gauge tool because I don’t find it necessary. First of all, you don’t need to check the rakers nearly as often as many people think, and secondly, when you have looked at teeth for long enough, you start to be able to see that gap between the tooth edge and the raker. So when I am bending down to inspect the tooth, I am seeing how the raker looks at the same time, and I can tell if I need to take a swipe off of it. One additional option to check your rakers is to set your flat file along the teeth which allows you to see the gap quite easily.


When you file the raker, you will be able to see a couple of straight lines on the top of it. This is how you will be able to tell which rakers you have done.


When you file a saw, you WILL file each tooth, even if it’s just a couple swipes to freshen it up, but you may NOT need to file down every raker on the chain. Do NOT over-file your rakers, you will regret it!


Side Dominance

So, now that you have finished all the cutters on the one side, you can set the file down, loosen the saw from the vise, and flip the saw around to do the other side of the chain. The process on the other side is exactly the same, except that everything is flipped backwards. This is where a lot of people run into difficulty because of side dominance issues. On the one side, you hold the file with the right hand, but when you flip the saw around, you have to hold the file with the left hand. So a lot of people will end up getting a different result on the one side of the chain than they do on the other.

I had to practice for years to overcome this side dominance issue but I think I pretty much have it licked by this point. My main technique for dealing with this is to use my whole body to move the file, as opposed to using just my arm. I can use just my arm on the right side but I find it much more difficult to push with just my arm on the left side. So, I basically try to lock my arm in position at my side and, bending forward at the waist, I use my whole body to move the file and basically just keep my arm stationary. The other thing that I do, as mentioned above, is I try to visualize myself as “pulling” the file, rather than “pushing” it. This way I can do things the same way on the left side as the right. These techniques have helped me to overcome the side dominance issues that are a part of filing chains, and I highly recommend that you experiment to find out what works best for you.


Well, there it is, Basic Chain Maintenance and Sharpening. I know this article is quite long-winded, but I hope you stuck around to the end and that you can get something out of it. Maintaining a chain properly takes a lot of theoretical knowledge of how chain works, and it takes a lot of practice to do it well. But it is very rewarding to be able to restore your chain at any time and have it cutting like new. It is better for your saw, and it is much better on you, the sawyer. The information in these last 2 articles took me years to understand and appreciate – I hope that I can accelerate that process for you.


Climb High, Work Smart, Read More.
– TreeMuggs


Continue Reading: Tree ID Book – The First 48 Trees

I would love to hear from you. Please send all comments/questions/hatemail  to patrick@educatedclimber.com

Filed Under: Back To Basics

How Saw Chain Works

March 12, 2017 By patrick@educatedclimber.com 10 Comments

Chain Line Drawing

(Note: This is Part 1 of my Chainsaw Basics Series. In this article we will explore the terminology and concepts of what saw chain is, and how and why it works.)

How can I keep my chain nice and sharp? This was the question that I was faced with in the first few months in the trade. I saw other guys taking round files and passing them over the chains, giving them a good scratch. So I said to myself, “that looks easy enough, I can do that.” So I experimented with it, emulating what I saw other people doing. Sometimes I got good results, sometimes, not so much. I kept trying, with mixed results, trying to figure out why I couldn’t do it as well as others. Turns out, I was simply asking the wrong question. Instead of asking “why am I not very good with a file”, what I should have been asking was “why does saw chain work in the first place”?

In order to truly maintain something mechanical, you must understand how and why it works. Knowing how to change the oil filter on your car does not make you an auto mechanic. Why does the oil need to be filtered? Why does the engine need oil at all? What is “internal combustion”? Likewise, when I was picking up a file and dragging it over the teeth, I was engaging in what is known as ‘outcome-based education’ whereby, I figured that knowing the ‘how’ would be sufficient to get me the results. As it turned out, what was actually important was the ‘why’.

Chain: The Basics

Saw chain moves at incredible speeds. When it is sharpened and working properly, it appears to “cut” through the wood. However, saw chain is not designed to cut, it is designed to remove material, one chip at a time. Anyone who has ever used a hand planer will see the same concept on a chain saw:

Hand Planer– drawing courtesy of www.lie-nielsen.com

Now look at a cutter from a modern chain:

How a Cutter Works - Resized


Why Saw Chain Works

So hopefully you can visualize the basic idea:

  • each tooth acts as a tiny chisel
  • IF: the chain is properly tensioned, the teeth are sharp, and the rakers are properly adjusted,
  • THEN: as the chain spins round and round the bar, with each pass, each tooth will remove one wood chip.
  • This is happening so fast that indeed it does appear to “slice” through the wood.

So, now that we have some context, lets look at what makes up a saw chain.


Overview of Chain Construction

Chain is comprised of several basic elements:

  • Cutters – combination of tooth and raker
  • Drive Links – allow saw to move the chain around the bar
  • Cutters and drive links are held together by Tie Straps and Rivets

Teeth are arranged in alternating right/left fashion to help a chain cut evenly and straight. Depending on the length of the chain for a certain size bar, there will either be an equal number of alternating left hand and right hand cutters, or the chain will end with 2 back to back same-side cutters.

Chain Specs

When purchasing a chain, there are three main elements to keep in mind, all of which will usually be stamped right on the bar of your saw. All three of these elements are concerned directly with the drive links of the chain. These three concepts are: Pitch, Gauge, and Number of Drive Links.  In order to go around in a loop, the drive links of a chain ride on two sprockets: one is on the clutch in the saw, and the other is on the end of the bar. When you purchased your saw initially, the dealer would have made sure that these two sprockets matched, and that the chain, in turn, matched them as well. Let’s take a closer look at these three main elements.


Pitch

Chain Pitch - resized

Pitch is technically defined as the distance between any 3 rivets divided by 2, but this definition isn’t very intuitive, at least to me. What pitch is really measuring is the size of the drive links and the distance between them.


Gauge

drive-link (removed detail)– drawing courtesy of www.rcpw.com

Gauge is just the width of the drive links where they fit into the groove in the bar. The gauge of a chain must match the gauge of the bar.


Number of Drive Links

This is how you match a chain to a certain length of bar. For instance, a 20″ bar migh be 72 drive links long.


There is one other major consideration to make when purchasing a chain, and that is concerned with the cutters themselves:

Cutter Type/Profile

– drawing courtesy of www.rcpw.com

There are many different variations of cutter types, but among standard arborist round ground chain, we can simplify and say that there are 2 basic types of teeth: either the top corner is rounded or it is square. Chain teeth with rounded corners are preferable in dirty cutting conditions as they hold their edge better if you get into dirt. These are usually referred to as low-profile or semi-chisel. The more efficient and better performing type of chain is square-cornered or full-chisel. This is the standard chain type that professional arborists use the most in residential tree work.


The Cutter: A Closer Look


– drawing courtesy of www.rcpw.com

Cutter

A modern cutter is the combination of a tooth and a raker. These two elements work in tandem to produce the cutting action – neither one on its own is capable of useful work in the slicing of wood.

Tooth – Top Plate and Side Plate

The front of the top plate forms the chisel edge, the part of the tooth that finishes the cut started by the corner. The top plate severs the wood chip, allowing it to be expelled.

Corner

The corner is where the top plate turns downward towards the rivets to form the side plate. The corner is the leading edge of the tooth and will make contact first with the wood, and so, the corner starts the cutting action of the tooth. To simplify, there are 2 basic types of corner – rounded or square.

Gullet

The gullet forms the space between the actual tooth and the raker.

Depth Gauge (Raker)

The depth gauge, or raker, is what prevents the chisel edge of the tooth from biting in too much into the wood. The difference in height between the raker and top plate determines the depth that the tooth cuts with each pass around the bar.

Grind

Grind refers to the shape of file or grinding wheel that is necessary to sharpen each tooth. Standard chain is all round grind – it is sharpened with round files. There is such a thing as square ground which means that the tooth is filed using a flat file. Square ground chain is used exclusively among big timber loggers who cut softwood trees all day and it is beyond the scope of this article.


I hope this overview of saw chain has been in-depth enough without being overwhelming. Following up from what I said at the beginning, it wasn’t until I took the time to really learn about chain and how and why it works, that I was really able to service, maintain, and sharpen chains. Follow along to the next article to learn the finer points of sharpening saws.

Continue Reading, Part 2 in this series: Saw Chain Maintenance and Sharpening.


Climb High, Work Smart, Read More.
– TreeMuggs


I would love to hear from you. Please send all comments/questions/hatemail  to patrick@educatedclimber.com


Filed Under: Arborist 101, Chainsaws

  • « Previous Page
  • 1
  • …
  • 9
  • 10
  • 11
  • 12
  • 13
  • Next Page »
  • The Manifesto
  • Subscribe to EducatedClimber
  • EducatedClimber on Youtube
  • Disclaimer
  • Amazon Affiliates Disclosure Page

Copyright © 2026 — Educated Climber.com • All rights reserved.