Learning how to climb trees using modern gear and techniques is a truly worthwhile pursuit. If you loved climbing trees as a kid for fun, then taking things to new heights with a rope and saddle might be just the thing you’ve been missing in your life. Every tree is an adventure and a challenge just waiting to be tackled, and every time you leave the ground you become immersed in a whole new world that very few people get to experience.
Axioms (First Principles) of Tree Climbing with Ropes:
A. What are we trying to achieve?
- Freedom of movement and full access to the structure of a tree, both vertically and laterally.
- Personal safety of the climber, i.e. minimal exposure to falls and swings.
- Minimum energy expenditure, using gear and techniques that are both ergonomic and efficient.
B. What do we use to achieve this?
- Work positioning system and PPE, i.e. rope(s), harness, lanyard, helmet, etc.
- Human (muscle) power, i.e. not reliant on externally powered or motorized climbing aids.
- Proprioception, i.e. the sense of self-movement and body position in three-dimensional space, achieved through agility, balance, and coordination.
C. What stands in our way?
- Gravity – opposes our upward progress, and, when dangling from a rope, turns us into a pendulum.
- Mass – opposes our upward progress and directly influences our muscular energy expenditures.
- Friction – opposes both the vertical and lateral movement of our climbing systems.
Tree Climbing: Terminology
Before we look at the concepts, let’s start by learning this basic terminology, what I refer to as “The Language of the Ropes“.
Tree Climbing: The Concepts
1. Tree Inspection
Before you can climb a tree, it must be inspected from the ground. Proper and thorough tree inspection requires experience and patience. Unsafe trees should not be climbed or rigged from. Tree inspection is too broad of a topic to tackle here, so let’s just look at the basics.
These are some of the major hazards to be aware of when inspecting a tree (not a comprehensive list):
- Large dead wood, widow makers, and hangers
- Cavities
- Cracks
- Weak Branch Unions (i.e tight crotches)
- Decay
- Mushrooms (fruiting bodies)
- Cankers
- Root problems (i.e. digging/construction, poor soil drainage, mushrooms, etc)
- Poor tree form (i.e. lean, storm damage, improper pruning, topping, etc.
- Lack of taper
- Structural defects
- Loose bark
- Electrical wires
- Insects/animals
You can find more information about what to look for before you begin climbing in this article: Before the Work Begins.
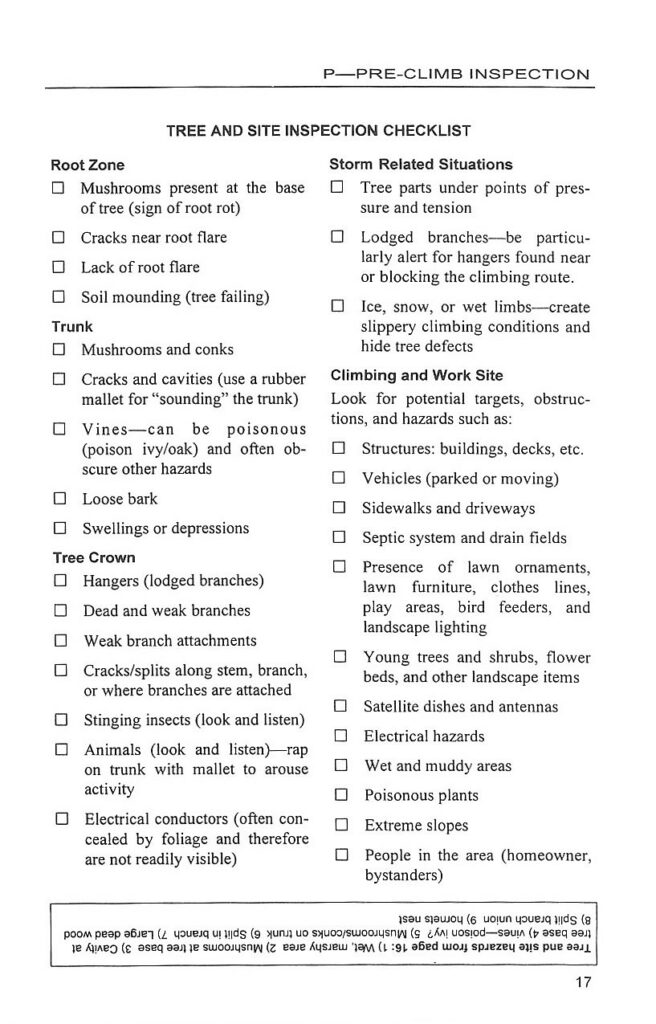
Presented here, with permission of the author, are pages 16 and 17 of the Tree Climber’s Companion by Jeff Jepson, covering some of the basics of tree inspection:

For more detailed information on this subject, see ‘The Tree Climber’s Companion 2nd Edition’ by Jeff Jepson, one of my most highly recommended books!
If you are new to tree climbing and have any doubts or questions about a given tree being safe to climb around in, please consult with an experienced professional who can help with tree inspection. This is Step 1 !!!
2. Work Positioning Systems
The climbing systems that we will be using to climb and access trees are part of a broader category of safety equipment known as work positioning systems. These systems include the rope(s), the climbing system, the harness, and all hardware in the system. To safely climb and access trees using our work positioning system, we will make use of 2 fundamental concepts: Anchor and Belay.
Anchor: what’s holding you up
In tree climbing, anchors are the branch unions and stems on a tree that support our ropes, which in turn support our bodyweight. These are also called tie-in points or suspension points. In other words, your anchor is what holds you up. In tree climbing, our anchor points are organic and non-rated, meaning that we never really know how much load they can handle. As such, anchor points are selected very carefully, using experience, good judgement and patience. Here on Educated Climber, we will denote anchor points in illustrations with this graphic:
![]()
Key Concept: Anchor Placement – High and Central
- For our primary anchor points, we usually want them as high and as central in the tree as possible. This will allow us the greatest freedom of movement and make work positioning easier.
- Secondary anchor points are selected to assist with work positioning goals in certain areas of the tree, as needed.
Belay: control the slack
All rope-based climbing systems revolve around the concept of belay, that is, controlling the amount of slack between the anchor and the climber. Slack is necessary for vertical and lateral movement, but slack is also dangerous and exposes a climber to a fall. As long as a climber stays below their anchor point and keeps the slack out of their system, then when they slip they are caught immediately by the rope and they take a swing. If they climb above their anchor point or they have slack in their system, then when they slip they can take a fall. In rock climbing, the belay is provided by a climbing partner, who manually pays out or takes in slack as required. In tree climbing, we use what are called self-belay systems, where the climber controls the amount of slack in their own system.
Key Concept: Belay is critical
- For a self-belay climbing system to be effective, the climber must be vigilant at all times to keep slack out of the system. This is critical to mitigate falls.
- Slack must only be used to allow a climber to move laterally outwards away from the anchor, or to descend downwards towards the ground.
Tree Climbing Technique: DdRT vs. SRT
The climbing systems (work positioning systems) we will use for accessing trees operate in 2 different and complementary setups. The first is called Doubled Rope Technique, or DdRT. The second is called Stationary Rope Technique, or SRT. Stationary Rope Technique can be further subdivided into 2 main setups, namely Base anchored, or Canopy anchored.

Our climbing training will revolve around these 3 main setups, namely DdRT, SRT with base anchor, and SRT with canopy anchor. There are other, more advanced hybrid-type climbing setups that are outside the scope of these 3, but you will find that these 3 main setups will allow us to accomplish everything we need to access and work on trees. It is important to note here that when it comes to the different climbing techniques and setups, one is not better than the other. They each have their place, and it will be essential that you have a solid working knowledge of both DdRT and SRT to be an Educated Climber.
A. Doubled Rope Technique (DdRT) – The traditional, “old school” tree climbing technique, wherein the climber’s line runs up from the ground, through a friction hitch (or mechanical device) at the saddle, then continues up and over a branch union (tie-in point), then back down to the climber where it terminates at the saddle (see diagram below). This setup forms an adjustable loop that can be made larger or smaller, allowing the climber to move towards or away from the tie-in point. Note that the entire length of rope is moving as the climber ascends or descends, making friction management an important concern.

B. Stationary Rope Technique (SRT) – modern style climbing system adapted from other rope-based disciplines, wherein the climber’s line is run up through a branch union (tie-in point), and either affixed to it directly, or run back to the ground where it is tied off. The climber is attached to the line by a friction hitch (or mechanical device). In this setup, the climber can ascend and descend with consistent friction, as the rope remains stationary, i.e. the climber is moving along a fixed line. SRT is usually set up in one of two ways, as shown below: 1. the base anchor, or basal anchor, where the rope is tied to the tree or a neighboring tree at the base, or 2. the canopy anchor, where the rope is tied off to a point in the canopy.

Climbing Technique – Finer Points
Doubled Rope Technique (DdRT)
- Adjustable loop climbing system where the entire length of rope is moving with the climber.
- This adjustable loop sets up a mechanical advantage of 2:1 at the anchor point, making it easier for the climber to pull themselves up on the rope compared to SRT.
- This mechanical advantage in pulling power is offset by the 1:2 ratio of pulling distance, meaning the climber has to pull double the amount of rope through their system to belay, compared to SRT.
- Rope is terminated at the climber, always have access to the end of your rope to remove it, or re-install in a different anchor at any time.
- Load on the tie-in point is equal to the weight of the climber.
Stationary Rope Technique (SRT)
- Rope is fixed in place, does not move with the climber.
- All movement is 1:1 on the rope, pulling power vs. pulling distance. This makes for efficient ascent and slack management compared to DdRT, but that efficient ascent usually requires more specialized gear.
- Rope is terminated remotely from the climber, i.e. do not usually have access to the end of your rope while climbing.
- With a Canopy Anchor, the load on the tie-in point is equal to the weight of the climber, same as in DdRT.
- With a Base Anchor, there is a force multiplier on the tie-in point, meaning that it experiences more than the weight of the climber.
Selecting the best climbing technique for the job
As previously noted, when it comes to the different types of climbing setups, one is not better than the other. They each have their place, and it will be essential that you have a solid working knowledge of both DdRT and SRT to be an Educated Climber. For myself, I use SRT most of the time because ascent is quicker and easier on the body, and I prefer moving through the canopy on a fixed line. I will use DdRT sometimes for smaller trees, as it is easier to advance the line in short sequences compared to SRT. I will also use DdRT in larger trees when I want a secondary rope with an easily removeable anchor point.
3. Climbing Systems ***UNDER CONSTRUCTION***
Now that we have a basic understanding of how the climbing rope is setup in the tree, let’s look at how a climber can use that rope to access the tree. We have already defined our work positioning systems as comprising rope(s), climbing system, harness, and hardware. The climbing system represents the interface between the rope in the tree and the harness on the climber. Ranging from the simplest designs of short pieces of rope known as hitch cords or “split tails”, all the way up to steel and aluminum “mechanical” devices, the climbing system allows a climber to “attach” themselves to the climbing rope and move up, down, and laterally, using the concept of “belay” that we discussed earlier.
Key Concept: 3 Functions of a Climbing System
- Advance – system “opens up” to advance climber’s position towards the anchor (ascent), and allows slack to easily pass through.
- Hold Fast – system grips the line automatically when not being advanced or released, holding the climber in place.
- Release – climber can manually release the line predictably and smoothly, allowing for movement away from the anchor, i.e. descent or lateral movement.
All proper climbing systems, regardless of price or complexity, are capable of these 3 basic functions. The difference between a simplistic, low-cost setup versus a high performance setup is often in the transitions, as many systems struggle when trying to move quickly between these 3 functions. For instance, you might descend some distance on your system, then stop and hang in place to do some work, and then try to ascend back up. A lot of hitch-based systems make it difficult to quickly move from a hanging, stationary position back into ascent mode, and will require the climber to manually “massage” some slack into the hitch cord before it will fully release and make the transition. Other systems, if not properly tuned and adjusted, will struggle to switch from ascent or descent mode into ‘hold fast’ mode, and will ‘creep’ some distance before fully gripping on the rope. Still other systems can be ‘jerky’ on descent, releasing too quickly and gripping abruptly, rather than smooth and predictable action.
Hitch-based climbing systems have many variables that can be adjusted to try to ‘dial in’ their performance, including the climbing rope (diameter, construction, materials), hitch cord (diameter, length, materials), and the hitch being tied. Even something as small as one extra twist in the eye of the hitch cord can influence the performance of a hitch-based system. These variables make for endless variations and combinations to be played with by a climber trying to get their system performing ‘just right’. Mechanical climbing devices usually have some degree of adjustability as well. Do not underestimate how significant a seemingly small change to your system can have on its performance.
The Whistle Stop Test
While a proper climbing system must be capable of all 3 functions mentioned above, namely Advance, Hold Fast, and Release, the most important of the 3 from a safety perspective is Hold Fast. It is essential that the climbing system grips the line automatically when not being manipulated by the climber. In other words, whenever the climber is neither ascending or descending, if they ‘sit back’ into their harness, the climbing system should grab on the rope to hold them in place, preventing a fall. One way to test this functionality of a climbing system is called the “Whistle Stop Test”, and can be particularly helpful for beginners. At any point during a climb, if an observer were to blow a whistle, the climber would have to instantly release their hands from the rope and system. If the climber had been properly belaying themselves (i.e. controlling the slack) and their climbing system was functioning properly, then their position would be fixed. They would not fall or drop upon releasing their hands. This would be a successful trial of the whistle stop test. If, on the other hand, they were to fall or slide down the rope some distance, they would fail the test and have to analyze why that fall happened.
4. Harnesses ***UNDER CONSTRUCTION***
The next basic component of our work positioning system is the harness. Also referred to as a saddle, the harness is worn directly on the body and allows the climber to “attach” themselves to the climbing rope via the climbing system using hardware.
If you want to learn more about the history and development of the modern arborist harness, check out this video by Don Blair from 1984 from Blair Glenn’s channel, and this article by Paul Poynter aka WoodenHand.
5. Hardware Basics ***UNDER CONSTRUCTION***
The basic unit of hardware for our tree climbing work positioning systems is the carabiner. The carabiner is a specialized type of shackle with a spring-loaded gate which allows for quick connection between ropes and other equipment, e.g. harnesses, slings, pulleys, etc. Important to note that carabiners (like ropes) are hugely popular for many other applications outside of life safety or climbing, so keep an eye out for the words “NOT FOR CLIMBING” that should be stamped on low-quality carabiners. All of the carabiners we use for life safety applications will be stamped with the CE logo.
Made of steel or aluminum (or aluminium in the Queen’s English), the basic carabiner consists of a spine, a nose, and a gate. Gate types include auto-lock, screw-lock, and non-locking. Basic shapes include oval, D, and HMS/pear. Rated carabiners are stamped with 3 strength ratings: Major axis, Minor axis, and open gate.
Action – deliberate movement required to open gate
Locking – deliberate movement required to prepare gate for opening
Triple Action, Double Locking Carabiner – requires 3 distinct movements to open the gate, the first 2 movements do the “unlocking”
The standard type of carabiner that we use for life safety in tree climbing is an auto-locking, triple action/double locking carabiner, with a major axis strength rating of
6. Installing the rope
In most tree work scenarios, we will set our primary anchor point(s) first, before the actual cutting and rigging get started. Sometimes this can be done from the ground, but often this is done by the climber as they ascend. One of the most frequently asked questions that we get from people watching is “how did you get the rope up in the tree?” Depending on the situation, we usually use some combination of 2 different techniques, namely 1. Advancing the rope manually, or 2. Using throwline. Let’s take a look at both of those techniques.
Advancing the rope manually
With most trees being a series of scaffold branches growing up and out of the trunk, it makes sense that the rope can be manually advanced by the climber as they climb. This is easiest using DdRT or SRT Canopy Anchor techniques.
 Advancing the rope
Using Throwline
While advancing the rope manually is good for shorter vertical distances of up to 20 ft (7 m) or so, larger distances usually require throwline. A throwline is just a small diameter string that we tie to a small weighted bag (sometimes called a throwball). Using various means, we can toss or launch this projectile up into the tree, where we can hopefully get it to drop into a branch union (crotch) and then run back down to the ground. We then remove the throwball and tie the throwline to a proper climbing rope which can be hauled up into the tree.
 Launching a throwball and throwline into a tree
Isolating the rope
For DdRT climbing, and SRT climbing with a canopy anchor, our rope must be “isolated”. For SRT climbing with a base anchor, the rope does not need to be isolated. The rope is ‘isolated’ when it captures just a single branch union. We say that a rope is isolated in a branch union (crotch) when the rope runs up from the ground, over the branch, and back down to the ground, with both legs of the rope following the exact same path, such that no branches are in between either leg of rope. In other words, you could tie both legs of rope together with a running knot, such as a running bowline, and that knot could be pulled up all the way to the branch where it would be tied off to that branch only.

One caveat to this concept would be the idea of a rope being “partially” or mostly isolated. In this case, the rope might capture multiple branches in the same area. There are times when this is satisfactory for our needs or even desired.
Videos
Climbing Systems: Basic Concepts – DdRT vs. SRT
A young man’s first experience climbing a tree with rope and saddle
******* This page is currently under construction. In the meantime, here are some tree climbing videos to check out:
Tree Climbing Systems: Progressions in Doubled Rope (DdRT)